domingo, 25 de novembro de 2018

Changing Python work to the cloud

Myobjectif is running my work Jupyter Notebook on Google Cloud Platform. After some tests using my machine to process deep learning using python, and medium data to process, its obvious that i need or to buy another computer ou migrate my work to the cloud. The cloud its my first option, rather than spending my money on a new GPU based laptop, and could be free on Google Cloud Colaboratory.
Google has a platform very flexible to develop and run Python notebooks (Colaboratory) . The platform can connect to read or write data from your computer, or connect to your Drive (Google Drive), that its very good because you can construct all your development in the Google Cloud. The platform has to a connection with GitHub that provide you run your Python notebooks saved in Github or at the end save the copies of your work in your GitHub.
Colaboratory is a free Jupyter notebook environment that requires no setup and runs entirely in the cloud. Functionalities:
>> Colaboratory allows you to execute TensorFlow code in your browser;
>> Colaboratory notebook provides recipes for loading and saving data from external sources.
>> Offer a Seedbank; a place to discover interactive machine learning examples;
>> Connection with GitHub. To load a specific notebook from github, append the github path.
>> Can importing a library that is not in Colaboratory. To import a library that’s not in Colaboratory by default, you can use !pip install or !apt-get install.
>> Charting in Colaboratory. A common use for notebooks is data visualization using charts. Colaboratory makes this easy with several charting tools available as Python imports.
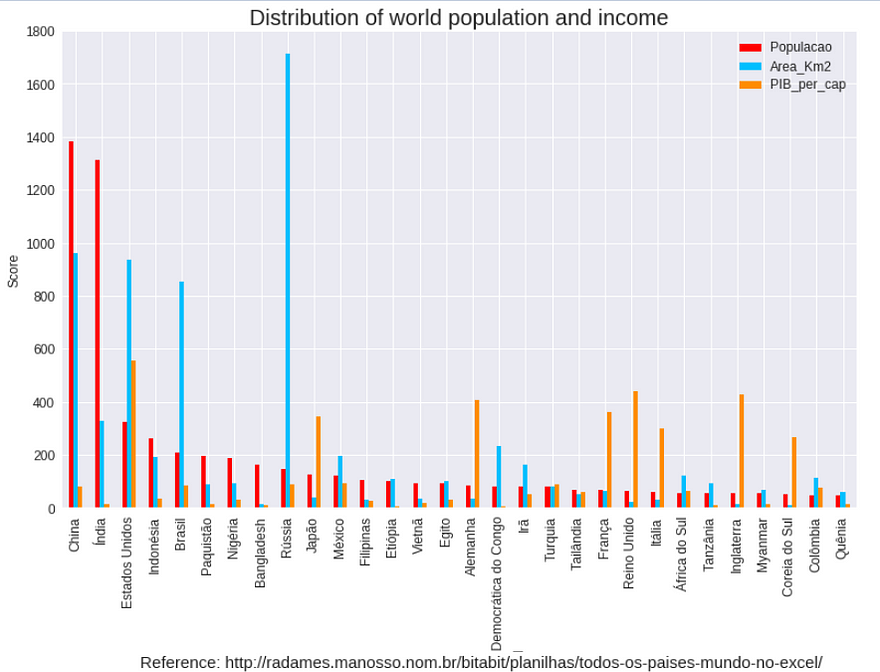
To test and research the functionalities that platform offer, i made some basic operations reading Excel files from my Google Drive, and plot informations. I used a table sheet with informations about territories (or countries) that have population, PIB (intern product),and area of the territory.
Conclusion: The platform is an excellent form to develop your work using Python, very consistent, fast and integrated with the common develope tools that we have today. It’s simple and free!


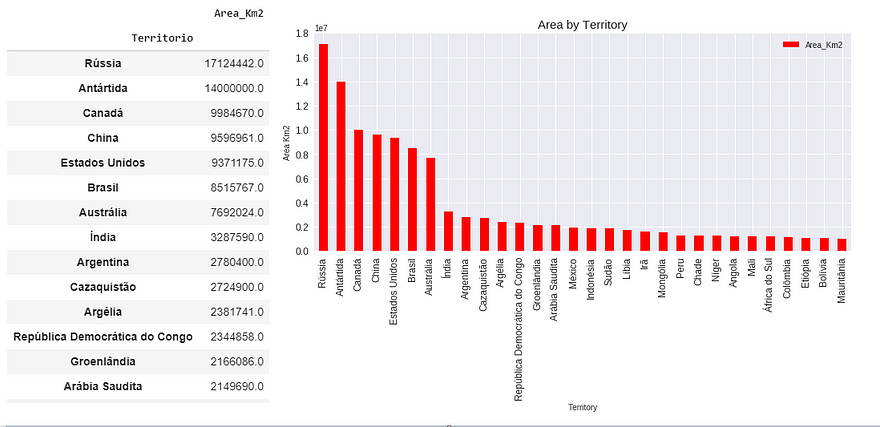
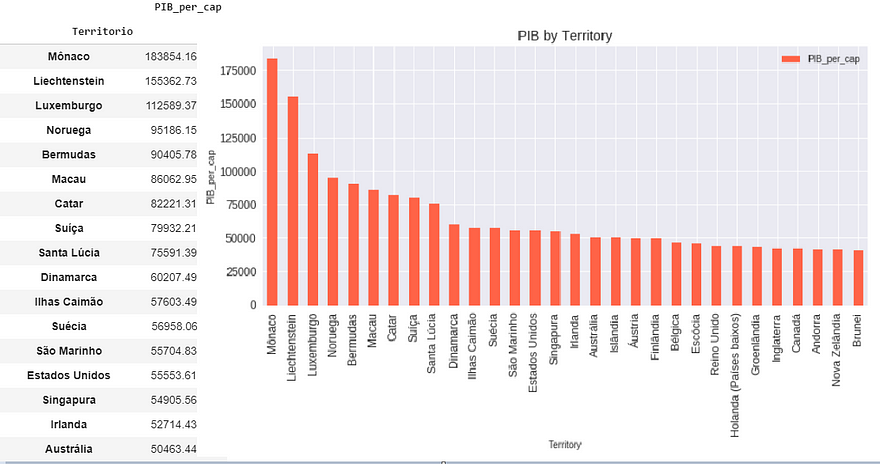
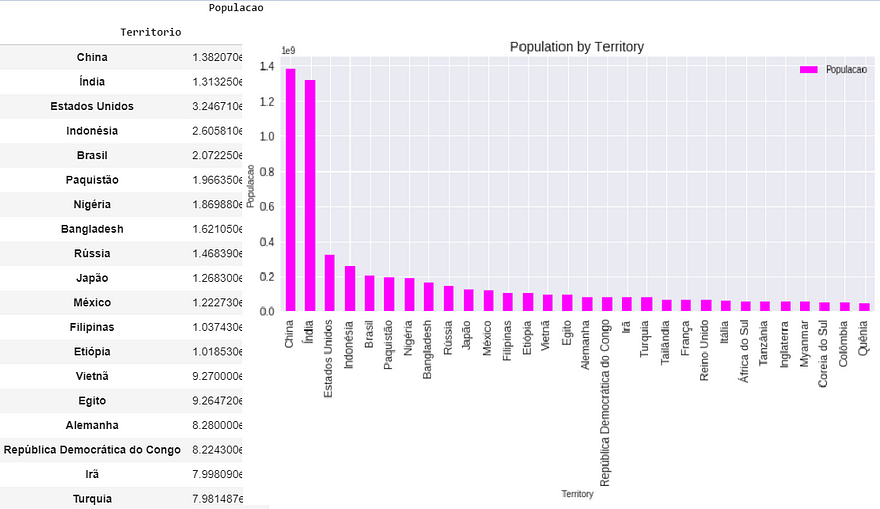
Analysis for all characteristics


See this work on GitHub:
Some references:
How use colabratec ( GPU free machine from Google):
How to read tables from Google drive:

quinta-feira, 15 de novembro de 2018

Facial Recognition

Facial Recognition

Facial Recognition, some explanation about

Recognize and manipulate faces from Python or from the command line with the world's simplest face recognition library.

How it works?

The human face, despite the variations from person to person, has a basic composition that does not change, read by the applications as points in common, that vary according to the complexity of the system.
By using logarithms and software that map this pattern to people, it is possible to record only the face or all movements and employ them in the most diverse functions. All have the same principle: detect a face in geometric and logarithmic shapes and then mount it as in a puzzle.
The face recognition system consists of three fundamental phases: face tracking, extraction and selection of facial features, and face recognition.
ScreenShot
The first step is to inform the coordinates of the characteristic points of the eyebrow, eyes, nose and mouth face.
Now the second step is to store the FACE and an ID (name if you prefer) for later authentication. In my Face-recognition_4 example I used an excel file with the photo's name and the person's name. In the Face-recognition_5 and 6 example I used the filename already named with people's names.
The first step is to identify through a camera (digital, webcam, cell phone, among others) all or some of these points in common, such as the two eyes and the distance between them, the nose and its length, the mouth, the cheeks and the chin, thus limiting the shape of the face and the space occupied by it.
In our algorithm ( face_recognition ) the system find the points:
chin
left_eyebrow
right_eyebrow
nose_bridge
nose_tip
left_eye
right_eye
top_lip
bottom_lip
These points are written and stored in the format of algorithms in a database, which recognize them through calculations. It sounds easy, but it all took some time to consolidate with the efficiency we see today.
The first application is also the simplest: to detect faces and small changes in it to improve portrait quality. Nowadays, practically every camera has a smile detection system, which automatically shoots when an element of the photo smiles - that is, when it changes the shape of the mouth relative to what was recorded on the camera.
Referencias:
www.tecmundo.com.br

My definitions

I have a folder with my images for training , folder images
in that example (Face-recognition_6) i use the name file to extrat the person name. All the images have the person name and a '-' to numerate. Example (manuel-1.jpg) i find the '-' in the filename and i extract the relevants positions to obtain the person name.
You can see my work on Gitub: https://github.com/MRobalinho/Facial-Recognition
Example saved in video:


sábado, 10 de novembro de 2018

Object_Prediction_and_Detecting-Image

Object_Prediction_and_Detecting-Image

Another example using Tensorflow to detect objects in an image.

As described by on ImageAI’s Github, multiple Python dependencies need to be installed:

Tensorflow 
Numpy 
SciPy 
OpenCV 
Pillow 
Matplotlib 
h5py 
Keras
Two CNN models are adopted as in the examples prediction and detection.
a) Prediction : resnet50_weights_tf_dim_ordering_tf_kernels.h5 - can be downloaded at fchollet’s deep-learning-models

b) Detection: resnet50_coco_best_v2.1.0.h5 - can be downloaded at fizyr’s keras-retinanet

ImageAI provides 4 different algorithms and model types to perform image prediction. To perform image prediction on any picture, take the following simple steps. The 4 algorithms provided for image prediction include SqueezeNet, ResNet, InceptionV3 and DenseNet. Each of these algorithms have individual model files which you must use depending on the choice of your algorithm. Some algorithms:

1. SqueezeNet (Size = 4.82 mb, fastest prediction time and moderate accuracy) 
2. ResNet50 by Microsoft Research (Size = 98 mb, fast prediction time and high accuracy) 
3. InceptionV3 by Google Brain team (Size = 91.6 mb, slow prediction time and higher accuracy) 
4. DenseNet121 by Facebook AI Research (Size = 31.6 mb, slower prediction time and highest accuracy) Image to Predict: 

Lets go to detection this image:


And the result is that:


See the code program on my Github:

Real time object detection using tensorflow

Real time object detection using tensorflow


Using Tensorflow to make program to predict and detection objects using my video-camera.

I use pre-trained models Tensorflow detection model zoo- COCO Dataset provide a collection of detection models pre-trained on the COCO dataset. 
These models can be useful for out-of-the-box inference if you are interested in categories already in COCO (e.g., humans, cars, etc). They are also useful for initializing your models when training on novel datasets.  

The result of my work is here:


See my code program on Github:


Object Detection Video

Object Detection Video

Detecting objects in videos and camera feeds using Keras, OpenCV, and ImageAI
Object detection is a branch of Computer Vision, in which visually observable objects that are in images of videos can be detected, localized, and recognized by computers. An image is a single frame that captures a single-static instance of a naturally occurring event 
On the other hand, a video contains many instances of static images displayed in one second, inducing the effect of viewing a naturally occurring event.

To do that, we need a Python library called ImageAI and install the following dependencies:

i. TensorFlow (tensorflow)
ii. Numpy (numpy)
iii. SciPy (scipy)
iv. OpenCV (opencv-python)
v. Pillow (pillow)
vi. Matplotlib (matplotlib)
vii. H5py (h5py)
viii. Keras (keras)
ix. ImageAI 
We use trained YOLOv3 computer vision model to perform the detection and recognition tasks.
My example cam be watched here:

The code program to my example is here, on Github:


Object detection Image - Another example

Object detection image Version 2


Using Tensorflow and pre-trained models i submit a foto from my friend and i, to the computer predict and detect the objects in the image.


The system identify many objects and detect all of them designing a rectangle.
You can see my code program here:
https://github.com/MRobalinho/MR_Object-detection-image_Ver2

Object detection image - Using Tensorflow

Object detection image

Building an Object Detection Model

When we’re shown an image, our brain instantly recognizes the objects contained in it. On the other hand, it takes a lot of time and training data for a machine to identify these objects. But with the recent advances in hardware and deep learning, this computer vision field has become a whole lot easier and more intuitive.
Using tensorflow algorithm , a product made by Google, and using pre-trained models (like COCO, Yolo, or Keras) we can submit an image to the computer algorithm and the system identify the objects in the image.
Predict this image:


Prediction: 
car : 76.26890540122986 
-------------------------------- 
car : 94.30564641952515 
-------------------------------- 
car : 70.49705386161804


The system made 3 executions and present us the object identified and the percentage of the precision it predict them.
See my code at: